Table of Contents
ToggleHEAT MOLD THE VASYLI ORTHOTIC
-
After determining the correct density, model, and size, check the patient’s footwear and remove any existing innersoles that may interfere with fitting.
-
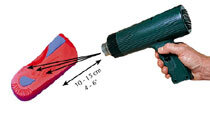
Place the orthotic (base up) on a heat-resistant surface. Apply the heat in a waving motion between the 2 Sorbon inserts (Fig 1). Do not concentrate the heat in one spot or along the arch profile as this may damage the product. When the raised lettering of the thermal indicator and the STC disappear, this indicates a molding temperature has been reached (approx. 194F / 90C).
-
With the patient sitting, place the heated orthotic into one shoe. For maximum comfort, ensure the patient is wearing a sock or stocking.
-
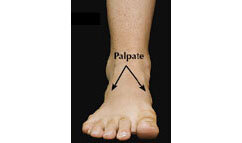
Place the foot into the shoe. Palpate and hold the foot in the neutral position, using the talonavicular technique (Fig 2). Ask the patient to stand with weight evenly distributed on both feet while maintaining the neutral position.
-
Palpate the shoe, molding up into the arch area and around the heel cup. Press down in the forefoot to mold to the last of the shoe.
-
Ask the patient to sit, controlling the neutral position until fully seated. Remove the orthotic from the patient’s shoe and allow it to cool for 5 minutes.
-
Repeat the process for the other foot.
-
Check for correct prescription and add VASYLI orthotic additions or wedges, if necessary.
 FIG 2 FIG 2 |
Talonavicular Technique
To place the subtalar joint into neutral:
-
Place your thumb and index finger on either side of the talonavicular joint and palpate.
-
When the joint feels equal or congruent, this represents a neutral alignment at the STJ. (i.e., no pronation or supination).


 FIG 1
FIG 1
